How to optimize and reduce the file size of SVG images
By Matt Visiwig  Aug 23, 2021
Many front-end designers reach for SVGs because they can keep page load times fast. But sometimes complex SVG files can end up with a high file size. In this article, I’m going to break down every possible way to shed bytes from your SVG, so you can keep your website load times fast.
First, before we dive into the very minutia of shedding bytes, let’s go check out a quick solution that handles plenty of simple use cases.
Fast-loading, optimized graphics: get your freebies here
Suppose you have a few premade icons, where the SVG code is small and savings will be limited. I would simply reach for SVG OMG and call it a day. You paste your SVG code into the tool and it will automatically remove access code using some of the techniques detailed below. This can take an icon that is .5kb to .4kb: a 20% saving, and all that work is done in less than a minute. Sounds like a win.
If you have a bigger file or are curious about hyper SVG optimization, let’s review the various ways we can shed those bytes.
The tools I use to reduce SVG file size
- Illustrator:
- Reach for these useful tools and menu options: smooth tool, simplify path, compound path
- A code editor
- Sometimes it’s best to make optimizations by hand
- Astute Graphics:
- VectorFirstAid plugin (premium plugin), start with free 7-day trial
- SVG OMG
- Helps with overall byte reduction process
- SVG Path Editor
- Minify or convert absolute and relative paths
Every single possible way to trim SVG file size
Optimizing an SVG can be quite complex. There are many considerations because SVGs consist of many elements and the process to create vectors doesn’t always consider the output will be the browser.
I ordered the list based on techniques that I consider effective and more likely to help trim the file size. The further you go down the list, the less likely the technique is useful or will shed meaningful bytes off your file. But we are trying to think of every possible tactic to reduce any number of characters, even if the method will only work in a rare case. Everything possible is included.
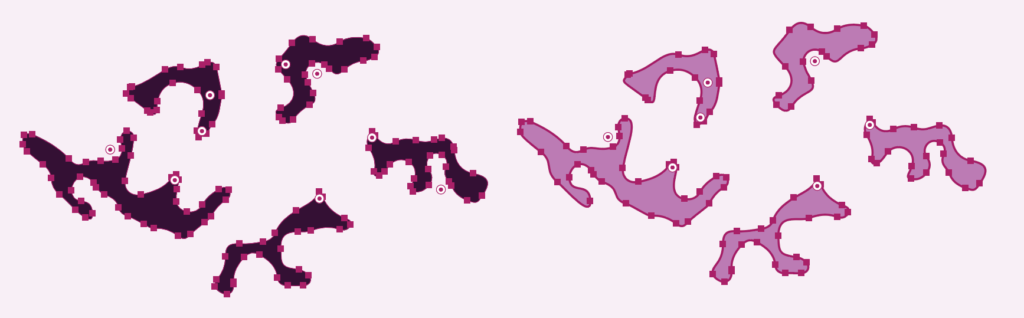
Use less anchor points
Each anchor point adds a handful of characters in your path. You can often skip an anchor point without much visual difference. Vector software is more concerned about precision and will often add lots of anchor points, even in situations where they’re not needed. Cleaning anchor points visually in your vector software is much easier than after you save the SVG. After the SVG is saved, finding those redundant points in code is like finding a needle in a haystack. I reach for Illustrator’s smooth tool and pen tool to manually simplify paths. For complex shapes and situations when there’s too many anchors to handle manually, I reach for the simplify path menu or even better: Astute Graphics has a tool to automatically clean useless anchor points that makes this process a cinch.
Remove any element or anchors that are out of view
Elements can be invisible, outside the viewBox, and completely behind other elements. In all these cases, if these SVG elements add nothing visually, they’re bulking up the file size for no reason. This idea also applies to comments in your code. For instance, Illustrator automatically adds export notes to SVGs that bulk up the SVG file. Discard that commented out code!
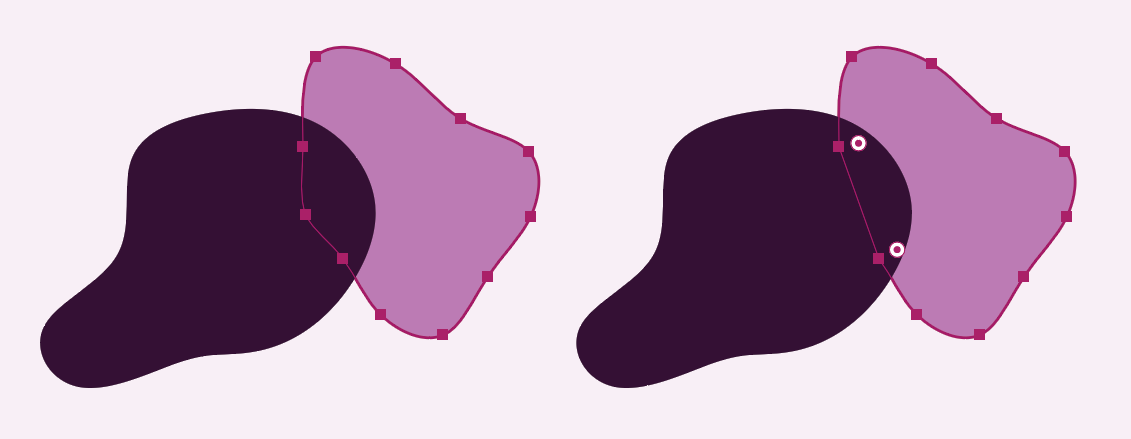
Simplify hidden sections
If a portion of a path is behind another element or outside the viewBox, remove the unseen curves and anchors. In the example below, not only could we safely remove an anchor point, we also removed the curve instruction between that section.
Rounding
If you use Adobe Illustrator, Inkscape, or any vector software to design SVGs, you’ll notice the output is often riddled with large decimals like 300.78000001. Cutting off a good chunk of those decimals will often result in no noticeable difference in the image when rendered in the browser. You may need to do some trial and error to get a good balance between simplification and accuracy. In the above example, I’d be confident in removing the “000001” by hand. But I might play around removing digits until I rounded all the way to 301. Using SVG OMG, you can control the level of precision, which controls how many decimals are used in your SVG attributes. I find this easier than doing this work by hand or choosing how many decimals in the dialog when you first save the SVG. You can help reduce the need to round by using the designing techniques, such as placing anchor points on whole pixels.
Combine separate paths
If you have multiple paths that are layered together and styles the same, you can combine them into a single path. In illustrator, select all shapes and Choose Object > Compound Path > Make. By code, you can place multiple paths into a single element’s d="" attribute.
<path d="M38 106l232-87-108 154-124-67z"/>
<path d="M235 5l289 72-95-152-194 80z"/>

<!-- combined -->
<path d="M38 106l232-87-108 154-124-67zm235 5l289 72-95-152-194 80z"/>
Use CSS classes to apply complex styles
If you are applying multiple attributes to a single element, the characters can add up. However, the moment you apply that complex class to multiple elements, you start to see savings. However, keep in mind CSS doesn’t work inside Data URIs.
Group elements with the same styles
If you have three elements that all have a fill of purple, you could simply wrap them in a group tag and only need one fill attribute to affect all three elements. This can work for most attributes and even with CSS classes.
<g fill="purple">
   <rect x="90" y="60" width="80" height="80"/>
   <rect x="260" y="60" width="80" height="80"/>
   <rect x="430" y="60" width="80" height="80"/>
</g>
Use the <use> element for duplicate shapes
The <use> element creates a copy of a specific element or group of elements. All you need is an ID and then you can change attributes or transform (scale, rotate, and translate). The more duplicates, the bigger the savings. Note specifically for Illustrator, the attribute should read xlink:href="" instead of simply href="" to work properly.
<rect id="square" fill="purple" x="90" y="60" width="80" height="80"/>
<use href="#square" x="90"/>
<use href="#square" x="180"/>
Use the ideal shape
Paths are generally the best shape to reach for when drawing, but when it comes to some rounded shapes, consider using those common instead. The path will likely be better than a polygon or a rect element, but rarely be shorter than a circle.
<!-- circle is shorter -->
<circle cx="54" cy="54" r="54"/>
<path d="M108 54A54 54 0 110 54a54 54 0 01108 0z"/>

<!-- path is shorter -->
<rect x="10" y="10" width="123" height="123"/>
<path d="M10 10h123v123H10z"/>

<!-- path is shorter -->
<polygon points="0,93.4 88,24.4 227,137.4 280,70.4 140,0 31,8.3"/>
<path d="M0 93.4l88-69 139 113 53-67L140 0 31 8.3z"/>
Simpler anchor points
If your anchor point has a curve it will take 4-7 numbers to describe an individual curve. Compare that to a curveless anchor point which only needs two coordinates, you’ll quickly realize that this reduces the instructions by 50% or more. Straight lines with the same X or Y coordinate only use one number. This is because if you use a path instruction that is completely level horizontally or vertically, your path will only need a single number for that path instruction.
Join anchor points
Some of the tools listed in the “less anchor points” method solve this, but not 100% of the time, so this issue deserves a mention. Vector software can create weird oddities. I’ve seen cases where there are two anchor points, with one layered above the other. One has a partial curve, leading into coordinate, and the other controls the curve leading away from the coordinate. This should be combined into one.
Here’s how to join these two anchor points in a single anchor:
- First ensure they share the exact same coordinate. Select them both and press CTRL+ALT+J to place them at the same coordinate (select both for axis), which is calculated by their average.
- Unite the entire shape (path) to clean up those anchors that are now exactly overlapping each other. This should turn those two anchors into one, while keeping the curve intact.
Avoid creating manual patterns
Instead of duplicating a bar to create stripes, create an actual stripe pattern. The pattern element will repeat shapes for you and will clearly keep the file size down over adding hundreds of the same shapes.
Avoid decimals
*This technique is situational as it can potentially make your file even bigger.*
If you have an 50x50px SVG icon and an anchor point has the coordinate [20.5, 30.1], instead of having to round, if you changed your dimensions to 500x500px, the anchor point will now fall on [205, 301]. This would eliminate two characters (the decimal) in the coordinate.
Use the shortest path command
If your path has coordinates that are nearby each other, using a relative path can help you omit a few digits here and there. In general a mix of relative and absolute commands will be shorter than a pure relative or absolute path.
Avoid negative numbers
This is similar to avoiding decimals, except there is less of a worry of this technique causing your file to be bigger. The idea is to avoid placing your coordinate system where there will be negative coordinates. The only worry is that sometimes this will push you out farther from [0,0], producing larger numbers in your coordinates. But if your path is dancing above and left of [-1,-1], you’re eliminating a character from every X and Y point.
Use short IDs and class names
Using long descriptive class names makes code more readable, but adds more characters to your file. This won’t save much unless the class name is used a bunch. Please note that this can backfire if you need descriptive class names. By default Illustrator uses short class names such as .st10 and if you place multiple inline SVGs in the same HTML doc, duplicate class names will integer with each other.
Tips when designing with Illustrator:
Use Illustrator’s pixel snapping mode to build on pixels, as this outputs whole numbers. Note, when you use a stroke of 1, 3, or any odd number, Illustrator will automatically place the path coordinates halfway between pixels because SVGs can only place the stroke in the middle of the path (and not inside or outside). Ideally you can avoid coordinates like [1.5, 8.5] by simply using an even stroke of 2, 4, 6, etc.
Hey, I'm Matt , the creator behind SVG Backgrounds. I produce free and paid resources every month, sign up for alerts.